Create a Drag & Drop Calendar JavaScript Add-in for Dynamics NAV 2017
MMEDDAH
Member Posts: 5
Create a Drag & Drop Calendar JavaScript Add-in for Dynamics NAV 2017
This walkthrough demonstrates how to create a Drag & Drop Calendar JavaScript control add-in and use it on a Microsoft Dynamics NAV page.
Creating a control add-in assembly file (.dll) with Visual Studio
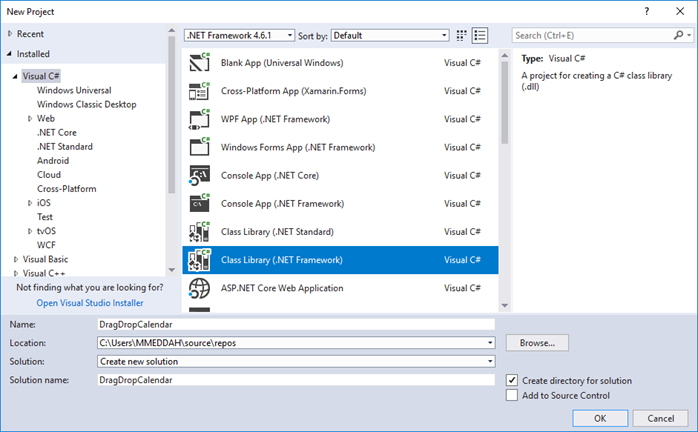
1. In Visual studio, create a new Project (Class Library)
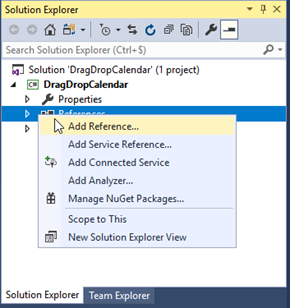
2. Add a Reference to the following assembly: Microsoft.Dynamics.Framework.UI.Extensibility.dll
By Default the path of the assembly is
C:\Program Files (x86)\Microsoft Dynamics NAV\100\RoleTailored Client.
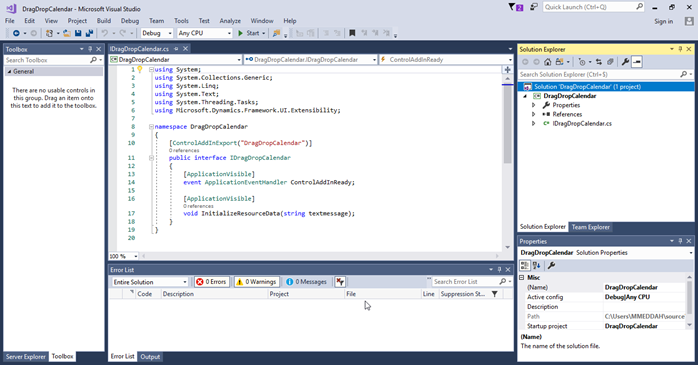
3. Declare a new Interface named IDragDropCalendar and add the following code.
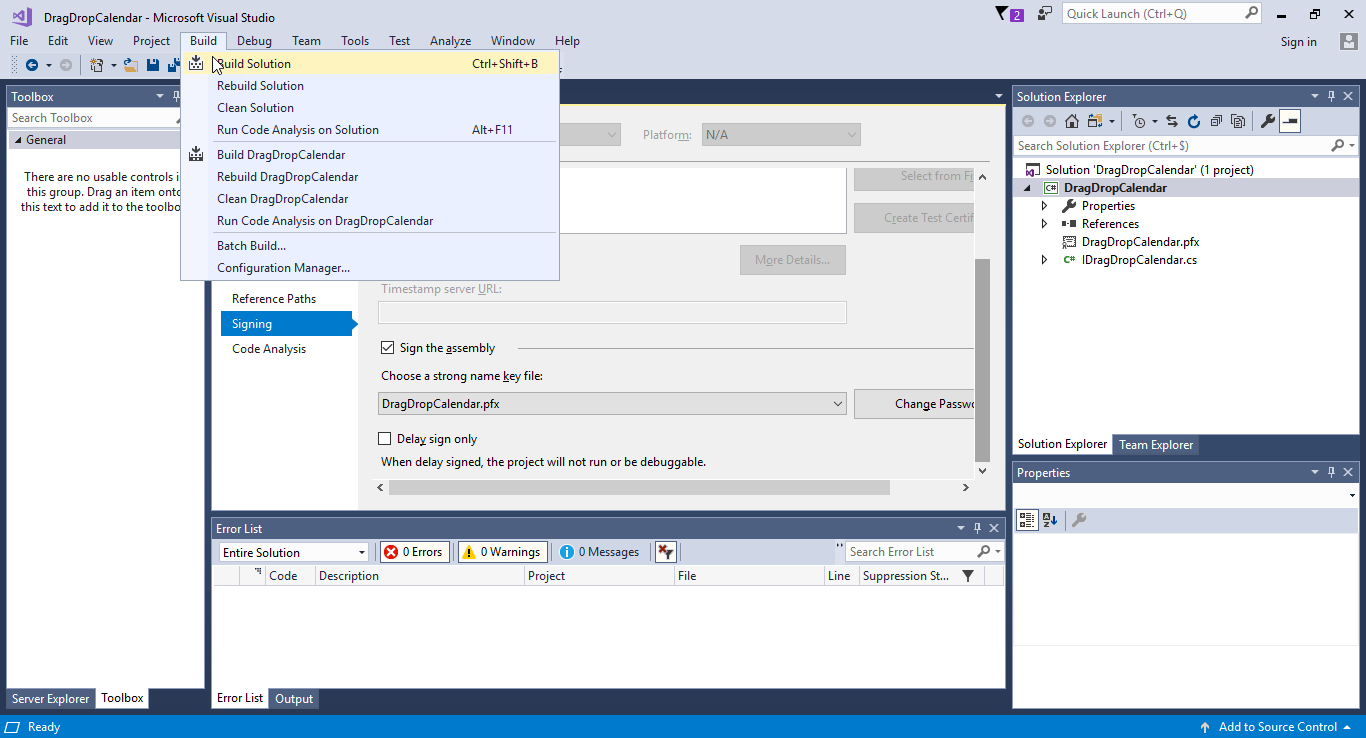
4. Sign the assembly
a. In Visual Studio, on the project menu, choose DragDropCalendar solution properties
b. Within the windows that appears, select the Signing tab
c. Tick the “Sign the assembly” checkbox.

d. In the Choose a strong name key file drop-down list, select New
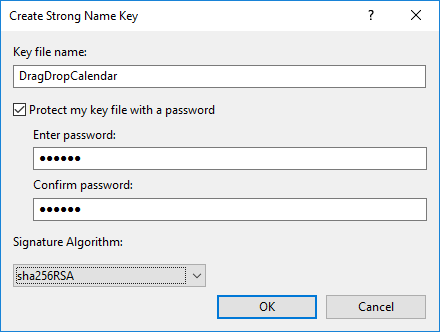
e. The Create Strong Name Key dialog box will be displayed and you can specify a name for key file.
You can specify a password to protect the file.
5. Build the solution
You can download the file from: https://drive.google.com/open?id=1uBoZRGVhsY7mJmSzKkAvUfqkjWNCpTx9
Creating a JavaScript Scheduler Application
1. Download the following libraries:
- bootstrap.min.js https://maxcdn.bootstrapcdn.com/bootstrap/3.3.2/js/bootstrap.min.js
- fullcalendar.min.js https://cdnjs.cloudflare.com/ajax/libs/fullcalendar/2.2.7/fullcalendar.min.js
- jquery-1.11.2.min.js https://code.jquery.com/jquery-1.11.2.min.js
- jquery-ui.min.js https://code.jquery.com/ui/1.11.2/jquery-ui.min.js
- moment.min.js https://cdnjs.cloudflare.com/ajax/libs/moment.js/2.9.0/moment.min.js
- jquery.xml2json.min.js https://cdnjs.cloudflare.com/ajax/libs/x2js/1.2.0/xml2json.min.js
- bootstrap.min.css https://maxcdn.bootstrapcdn.com/bootstrap/3.3.2/css/bootstrap.min.css
- fullcalendar.min.css https://cdnjs.cloudflare.com/ajax/libs/fullcalendar/2.2.7/fullcalendar.min.css
2. Open your favorite IDE (Notepad ++ for example) and create three files
o DragDropCalendar.js https://drive.google.com/open?id=1vqofLGhsu2Q2JmkuWBlKNx5tTJTRlkJj
o DragDropCalendar.css https://drive.google.com/open?id=1o8MNyjDQdGnrK0eQNuaIhrIjrZMq1udi
o Manifest.xml https://drive.google.com/open?id=1o2INN7AHbjN6N4AloRioYf8QIHdIPCes

Creating a Resource .Zip File
Before registering the control add-in in Microsoft Dynamics NAV, you must create a .Zip file containing the Manifest and any resource files.
1. On your computer, in a folder of your choice, create the following structure
Image, Script and StyleSheet
2. Locate the Manifest.xml that you created in the previous steps, and copy this to the same folder structure.
3. Place images, scripts and stylesheet in the right folders.
In this walkthrough, we will leave the Image folder empty.

4. Select File and Folders, then right click the highlighted area
5. In the WinZip sub-menu, choose add to Zip File
6. Rename the .Zip File to DragDropCalendar.zip

Copy the Control Add-in Assembly and Resource .Zip to the MS Dynamics NAV Development Environment
By default, this folder is C:\Program Files (x86)\Microsoft Dynamics NAV\100\RoleTailored Client\Add-ins

Registering the Control Add-in in Microsoft Dynamics NAV
To register the control Add-In, we must provide the following information:
Control Add-in name
The name of the control add-in, is determined by the

The name in this walkthrough is DragDropCalendar.
Public key token
To determinate the public key token for the control Add-In:
a. Open Developer Command prompt for VS2017
b. At the command prompt, change to directory that contain the assembly
c. Type the following command: sn -T DragDropCalendarAddIn.dll


Include the control add-in in the control add-in page
In the Search box, enter Control Add-in and then choose related link.
Chose New, and then fill the column with the appropriate value.

With the Control add-in page still open, you import the resource (DragDropCalendar.zip) file.

Create a Page to Display the Control Add-in
Before creating the page, you need to recover the list of resource, for this:
1. Create a new XmlPort called Export Resource List and set the properties like below:
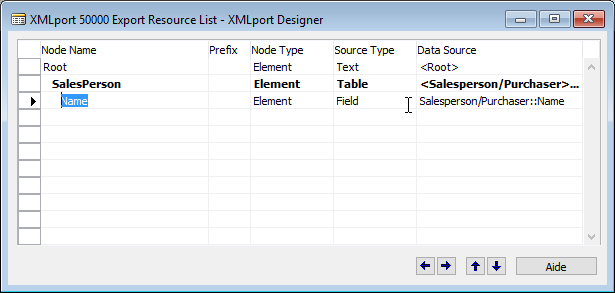
For this purpose, you will recover only the name of our resource:
The property Temporary of the Element SalesPerson must be set to Yes

2. Add code to initialize our Temporary record.
o Add Global function: SetResource
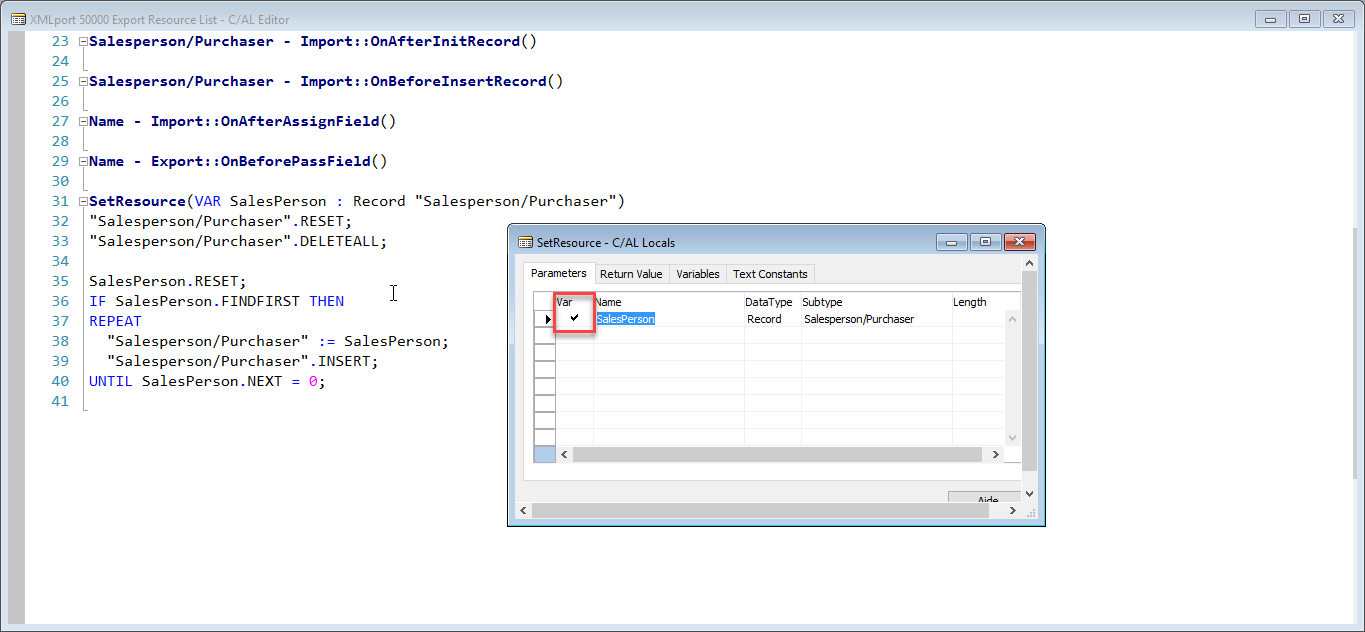
3. Create a Codeunit: Drag&Drop Calendar Management and add the following function.
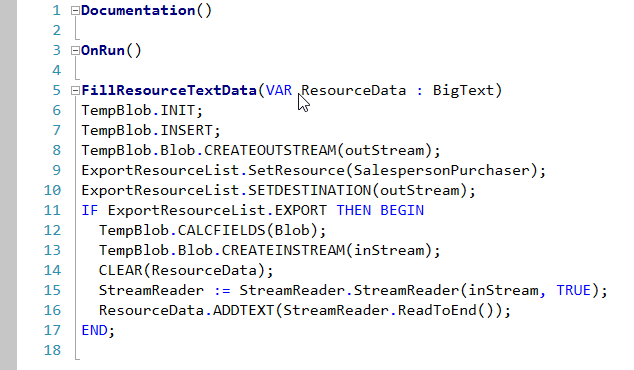
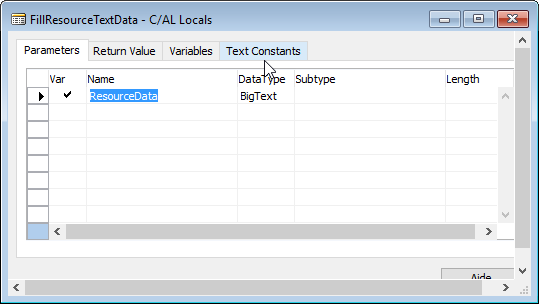
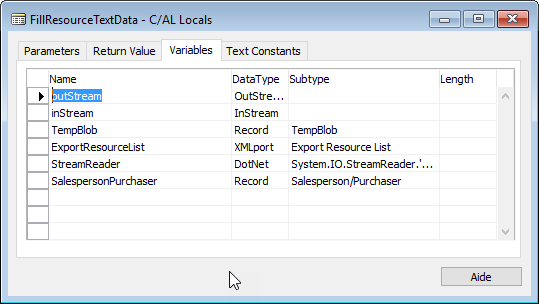
4. Create a Page Drag & Drop Calendar
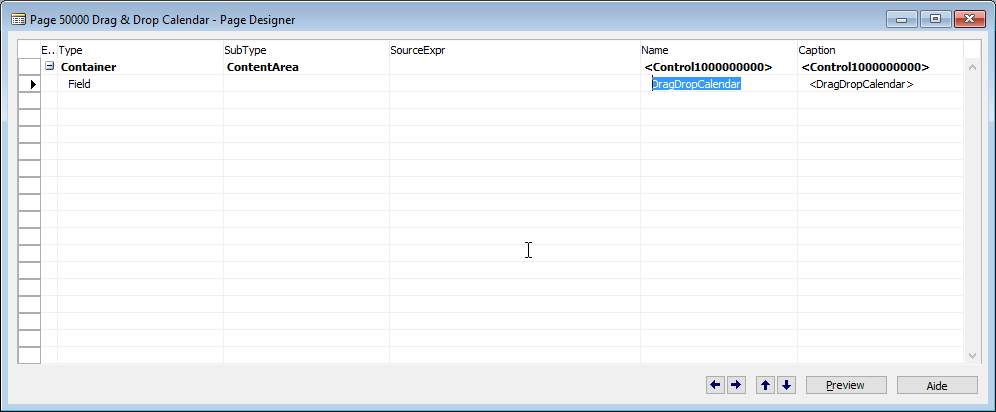
Set the property of Field as below:
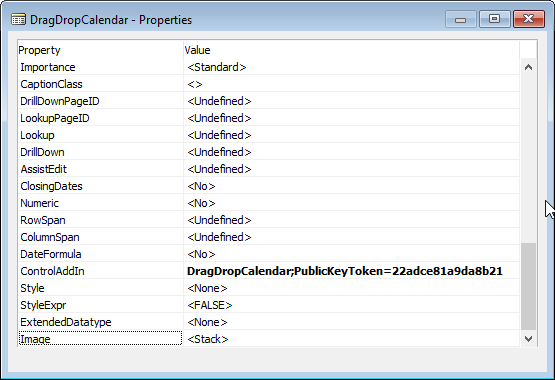
To Add the C/AL Code triggers, locate the DragDropCalendar::ControlAddInReady() and add the following line.
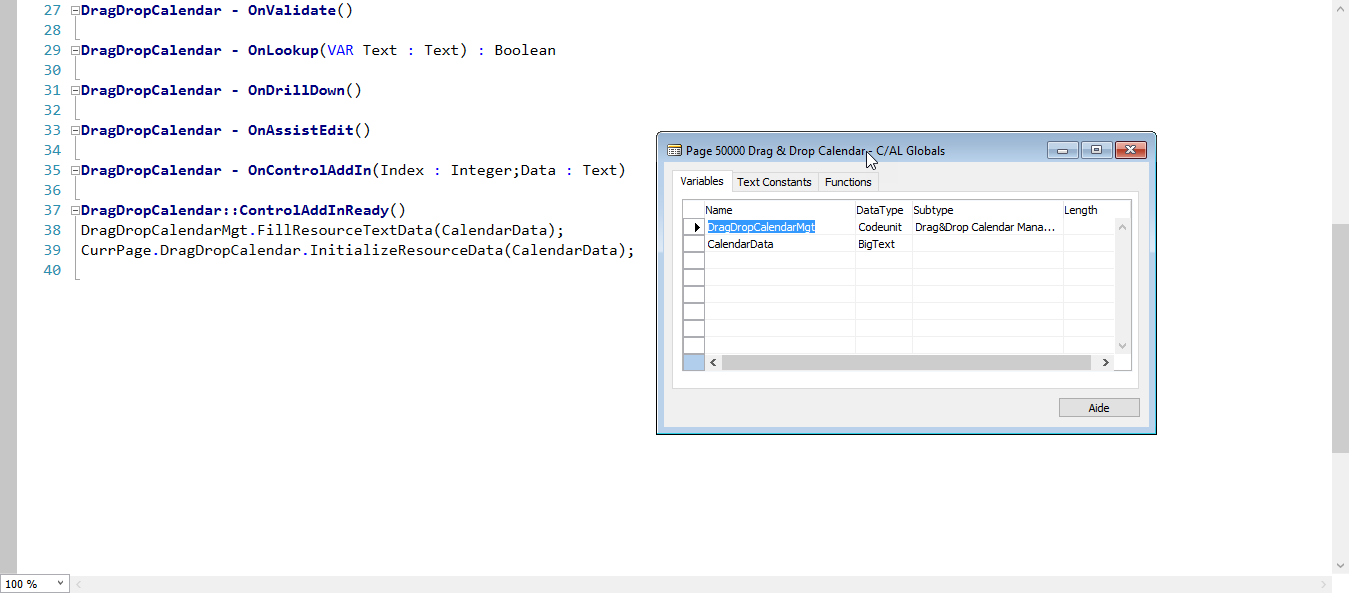
Download File: https://drive.google.com/open?id=1hZs2isJydxDMvXOiBJ0Zs6Rfqsigkx4h
Run the page and Enjoy.

4
Comments
-

From the picture to the page. What is the cause?
0 -
Same problem for me.
Inside the manifest file I can see the reference to "ResourceScheduleMain.js" and ResourceSchedule.css", but I can't find links to those files in your post. Maybe this is the problem.
Where can I find "ResourceScheduleMain.js" and ResourceSchedule.css" files ?0 -
Sorry i mad a mistake.
This is the right Manifest file.<?xml version="1.0" encoding="utf-8"?> <Manifest> <Resources> <Script>jquery-1.11.2.min.js</Script> <Script>jquery-ui.min.js</Script> <Script>jquery.xml2json.min.js</Script> <Script>moment.min.js</Script> <Script>bootstrap.min.js</Script> <Script>fullcalendar.min.js</Script> <Script>DragDropCalendar.js</Script> <StyleSheet>DragDropCalendar.css</StyleSheet> <StyleSheet>fullcalendar.min.css</StyleSheet> <StyleSheet>bootstrap.min.css</StyleSheet> </Resources> <Script> <![CDATA[ $(document).ready(function() { InitializeCalendar(); Microsoft.Dynamics.NAV.InvokeExtensibilityMethod('ControlAddInReady', null); }); ]]> </Script> <RequestedHeight>400</RequestedHeight> <RequestedWidth>900</RequestedWidth> <MinimumHeight>400</MinimumHeight> <MinimumWidth>900</MinimumWidth> <VerticalStretch>true</VerticalStretch> <HorizontalStretch>true</HorizontalStretch> <VerticalShrink>true</VerticalShrink> <HorizontalShrink>true</HorizontalShrink> </Manifest>0 -
I have edited as you said. The result is this.

This is Manifest.xml.
All file in project.
For jquery.xml2json.min.js file I downloaded it and got it. xml2json.min.js I'm not sure if this is relevant to the results. But I fixed it. jquery.xml2json.min.js Then follow the picture I sent.
How do I fix a problem? To display the calendar.
If possible, I would like to request a file. DragDropCalendar.csproj obtained at sign assembly.
Thank you.1 -
Would love to try this out...
Have you managed to get round the issue you are having?0 -
Thanks to this walktrough. It works for me in NAV 2015.
However, I would like to show some information about the events when the mouse is over it. The eventMouseover and eventRender callbacks don't seem to work in my case.
0 -
I am using 2018 as well and have the same issue ZII, any help getting this working would be great!0
-
@RickTweedle @ZII
You can download the project from :
https://drive.google.com/file/d/1DanYVUJSt4CKr1sdK0kTyPlm_RDc4d_w/view
0 -
I got the issues resolved with making the sales people appear - just need to make it useful now (i.e. triggering events in NAV to says "appointment X for start datetime Y end datetime Z has changed"... and to add a way of populating the calendar with appointments.
Excellent starting point / proof though1 -
Did someone make it works in 2018¿? Is the full project finished¿? Thanks0
Categories
- All Categories
- 73 General
- 73 Announcements
- 66.7K Microsoft Dynamics NAV
- 18.8K NAV Three Tier
- 38.4K NAV/Navision Classic Client
- 3.6K Navision Attain
- 2.4K Navision Financials
- 116 Navision DOS
- 851 Navision e-Commerce
- 1K NAV Tips & Tricks
- 772 NAV Dutch speaking only
- 617 NAV Courses, Exams & Certification
- 2K Microsoft Dynamics-Other
- 1.5K Dynamics AX
- 333 Dynamics CRM
- 111 Dynamics GP
- 10 Dynamics SL
- 1.5K Other
- 990 SQL General
- 383 SQL Performance
- 34 SQL Tips & Tricks
- 35 Design Patterns (General & Best Practices)
- 1 Architectural Patterns
- 10 Design Patterns
- 5 Implementation Patterns
- 53 3rd Party Products, Services & Events
- 1.6K General
- 1.1K General Chat
- 1.6K Website
- 83 Testing
- 1.2K Download section
- 23 How Tos section
- 252 Feedback
- 12 NAV TechDays 2013 Sessions
- 13 NAV TechDays 2012 Sessions
 can you help me thanks.