how you can Continuous Integration and Deployment for Ruby projects with Bitbucket Pipelines

NicoleKristen
Member Posts: 4
in Dynamics AX
The sample project will be a simple Rails app. The project contains some RSpec tests, code style checking with Rubocop and will be deployed to Heroku.
The rails app contains one controller that takes a route parameter name and returns “Hello <name>!” which will be tested with some simple Capybara tests. If you want to, you can check out the source code here.
Let’s assume the following development workflow:
Improvement will just occur inside component branches. In these branches Pipelines should just run the Rspec tests and Rubocop (Continuous Integration). At the point when the component is prepared, it will be converged into the ace branch. Presently the tests and rubocop should likewise run and when all is well, the source code ought to be sent to Heroku (Continuous Deployment)
Continuous Integration
Bitbucket Pipelines uses Docker containers as environment for your build steps. By default an image with ubuntu 14.04 and some preinstalled applications (java, maven, python, gcc, node, npm, nvm, git) will be used.
As this default image does not contain ruby we need to specify a docker image that contains it. You can use any image from DockerHub as well as images from a private registry if needed.
I will use the ruby-node image from DockerHub, because i also need NodeJS for the uglifier gem.
Next we need to specify the build steps. For my needs these will be:
install dependencies
run specs
run Rubocop
To configure the docker image and the build steps, these lines have to be put inside a bitbucket_pipelines.yml file, which will reside in the project root:
image: starefossen/ruby-node:2-5
pipelines:
default:
— step:
script:
— bundle install --jobs=2 --without=development
— rspec spec -f d
— rubocop
When I commit and push this file now, a new build will start (Pipelines has to be enabled for the project before this):
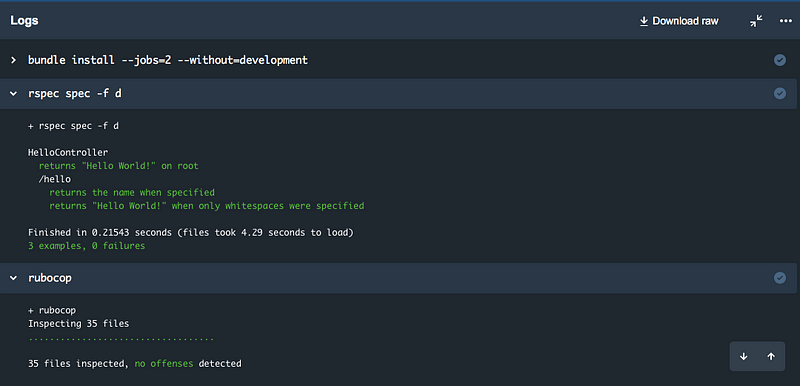
And that’s it already for Continuous Integration! Every commit will now trigger a new build.
Deployment
As mentioned above I want to deploy the project to Heroku when a feature got merged into the master branch. This can be achieved by adding this branch pipeline to the configuration:
image: starefossen/ruby-node:2-5
pipelines:
default:
[...Truncated...]
branches:
master:
- step:
script:
- bundle install --jobs=2 --without=development
- rspec spec -f d
- rubocop
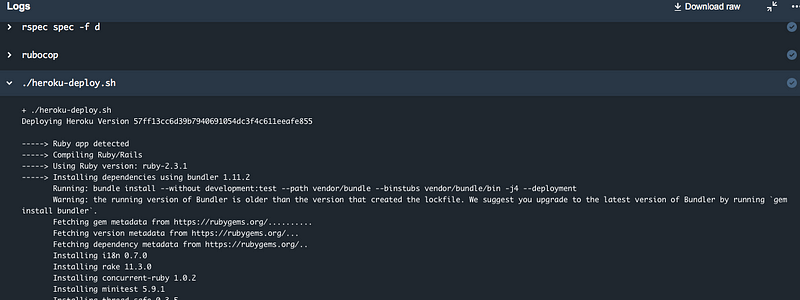
- ./heroku-deploy.sh
The default pipeline will run for all branches except for the master branch, because there is a special pipeline specified.
The deployment will be done by the heroku-deploy.sh that i have copied from Bitbucket. Make sure to add the script with execute rights to your repo:
chmod +x heroku-deploy.sh
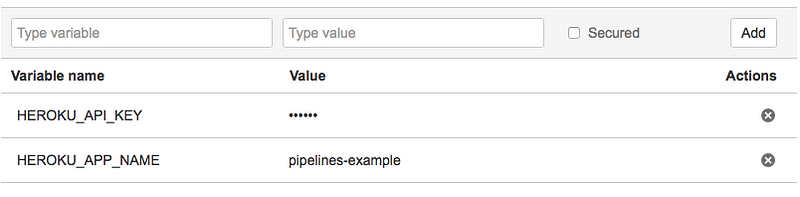
Now the Heroku API-Key and the name of the app has to be configured as environment variables. To do this, go to your repo settings -> Pipelines -> Environment variables. Run heroku auth:token and use the result for HEROKU_API_KEY (make sure to check “Secured” for the key):
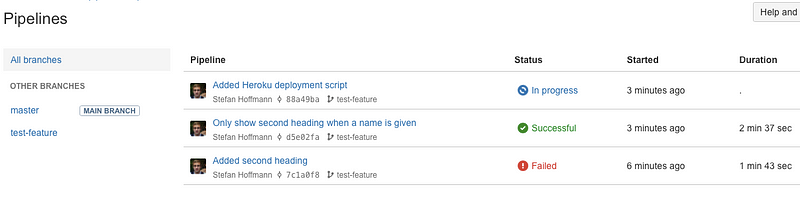
A merge (as well as normal commits) into master will now trigger a new build and will deploy the code to heroku if everything succeeded:
The fact that you can use any docker image as build environment gives you many possibilities and can also work for more complicated test setups.
As an example: What if you need a database service — say MySQL — for your tests? No problem. Specify a docker image that includes the service, add a script to setup the database and add it as build step. This is also included in the Bitbucket documentation with some implementation examples.
The rails app contains one controller that takes a route parameter name and returns “Hello <name>!” which will be tested with some simple Capybara tests. If you want to, you can check out the source code here.
Let’s assume the following development workflow:
Improvement will just occur inside component branches. In these branches Pipelines should just run the Rspec tests and Rubocop (Continuous Integration). At the point when the component is prepared, it will be converged into the ace branch. Presently the tests and rubocop should likewise run and when all is well, the source code ought to be sent to Heroku (Continuous Deployment)
Continuous Integration
Bitbucket Pipelines uses Docker containers as environment for your build steps. By default an image with ubuntu 14.04 and some preinstalled applications (java, maven, python, gcc, node, npm, nvm, git) will be used.
As this default image does not contain ruby we need to specify a docker image that contains it. You can use any image from DockerHub as well as images from a private registry if needed.
I will use the ruby-node image from DockerHub, because i also need NodeJS for the uglifier gem.
Next we need to specify the build steps. For my needs these will be:
install dependencies
run specs
run Rubocop
To configure the docker image and the build steps, these lines have to be put inside a bitbucket_pipelines.yml file, which will reside in the project root:
image: starefossen/ruby-node:2-5
pipelines:
default:
— step:
script:
— bundle install --jobs=2 --without=development
— rspec spec -f d
— rubocop
When I commit and push this file now, a new build will start (Pipelines has to be enabled for the project before this):
And that’s it already for Continuous Integration! Every commit will now trigger a new build.
Deployment
As mentioned above I want to deploy the project to Heroku when a feature got merged into the master branch. This can be achieved by adding this branch pipeline to the configuration:
image: starefossen/ruby-node:2-5
pipelines:
default:
[...Truncated...]
branches:
master:
- step:
script:
- bundle install --jobs=2 --without=development
- rspec spec -f d
- rubocop
- ./heroku-deploy.sh
The default pipeline will run for all branches except for the master branch, because there is a special pipeline specified.
The deployment will be done by the heroku-deploy.sh that i have copied from Bitbucket. Make sure to add the script with execute rights to your repo:
chmod +x heroku-deploy.sh
Now the Heroku API-Key and the name of the app has to be configured as environment variables. To do this, go to your repo settings -> Pipelines -> Environment variables. Run heroku auth:token and use the result for HEROKU_API_KEY (make sure to check “Secured” for the key):
A merge (as well as normal commits) into master will now trigger a new build and will deploy the code to heroku if everything succeeded:
The fact that you can use any docker image as build environment gives you many possibilities and can also work for more complicated test setups.
As an example: What if you need a database service — say MySQL — for your tests? No problem. Specify a docker image that includes the service, add a script to setup the database and add it as build step. This is also included in the Bitbucket documentation with some implementation examples.
0
Categories
- All Categories
- 73 General
- 73 Announcements
- 66.7K Microsoft Dynamics NAV
- 18.7K NAV Three Tier
- 38.4K NAV/Navision Classic Client
- 3.6K Navision Attain
- 2.4K Navision Financials
- 116 Navision DOS
- 851 Navision e-Commerce
- 1K NAV Tips & Tricks
- 772 NAV Dutch speaking only
- 617 NAV Courses, Exams & Certification
- 2K Microsoft Dynamics-Other
- 1.5K Dynamics AX
- 326 Dynamics CRM
- 111 Dynamics GP
- 10 Dynamics SL
- 1.5K Other
- 990 SQL General
- 383 SQL Performance
- 34 SQL Tips & Tricks
- 35 Design Patterns (General & Best Practices)
- 1 Architectural Patterns
- 10 Design Patterns
- 5 Implementation Patterns
- 53 3rd Party Products, Services & Events
- 1.6K General
- 1.1K General Chat
- 1.6K Website
- 83 Testing
- 1.2K Download section
- 23 How Tos section
- 252 Feedback
- 12 NAV TechDays 2013 Sessions
- 13 NAV TechDays 2012 Sessions